Archive for February, 2007

AI: Exporting a layered PSD from Illustrator

Monday, February 26, 2007

titill_layered.jpg

Illustrator has an option to export a file as a .psd file while keeping layers intact. First, you need to keep one thing in mind, you need to decide first if you will be working on it in RGB or CMYK colorspace in photoshop. Illustrator only lets you export layered psd’s from RGB to RGB or from CMYK to CMYK, not across colorspaces.

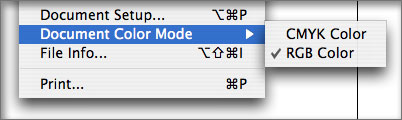
For instance, to export a file as a layered RGB file you first need to check if your Document Color Mode within Illustrator is set to the correct value. Go to File>Document Color Mode and make shure it is set to RGB.

ailayered1.jpg

Then make sure you have a few layers to export, and keep in mind that multiple objects on the same layer will export as one layer. If you need to break down your illustration to a few layers you can use the Layers palette to create new layers and cut/paste your objects on the new layers (keep in mind that the Paste in Front & Paste in Back functions in the Edit menu will paste objects in exactly the same location on a new layer as they were cut from).

ailayered2.jpg

After you make shure you have some layers to export, go to File>Export… and in the dialog box select Photoshop (psd) from the Format dropdown list. Then name your file and click Export.

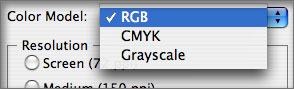
Now, “Photoshop Export Options” should pop up and you can select a variety of options. At the top of the dialog box you should see a Color Model dropdown list. Make shure this is set to the same setting as the Document Color Mode setting if you want to export as layers. We are now looking at RGB, so select that from the list. The same dropdown menu also has an option to export to Grayscale, using that setting will have the option to export to layers no matter what Document Color Mode you are working on.

ailayered3.jpg

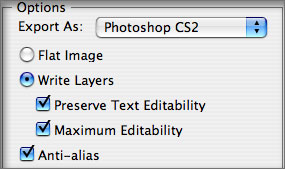
Make sure you select Photoshop CS2 from the “Export As” dropdown list (or CS depending on your version), and also make sure Write Layers is selected. If you have some text you can choose to keep it editable within Photoshop by selecting Preserve Text Editability.

ailayered4.jpg

Click OK and you’re done.

Now open your exported file in Photoshop and make sure it has your layers intact.

CMYK exporting works the same way, just make sure you have it set correctly in Document Color Mode and select CMYK in the Color Model dropdown list.

UPDATED: It has come to my attention that in some cases Illustrator will give an error while exporting or Photoshop will give an error while opening such a file. In this case it may be that you have a bunch of items around your artboard that you don’t want to export but Illustrator will try to do it anyway.

It is important to remember that Illustrator will not only confine the PSD export to the artboard, but will export everything within the file. Before exporting a PSD you could try cleaning up your file and get rid of things you don’t need to export that are perhaps around the artboard. If not, chances are you’ll get an export error.

UPDATE 2: Since this post has been quite popular and people are having trouble with this I have gone through this process again with CS3.
Illustrator CS3 will export a single layer to PSD to a photoshop layer group. That means all of your art on a single layer in illustrator will export as a layer group with sublayers intact. However if you have compound paths or open shapes on some layers, exporting will likely merge those layers. To export your elements to layers, simply group the ones you want to have as a layer (yes group single shapes too), ann export as shown above. I will post a revised version of this with step by step images soon.

AI: Snapshot Common Actions

Thursday, February 22, 2007

Illustrator Effect Presets

Often I find myself having to do the same action over and over again within Illustrator. But some effects have no way of saving a preset or keeping their settings intact. Of course If you are working on a bunch of items and applying the same effect from the effects list over and over again you have the option to reuse the last effect. But what If you use other effects in between or turn off your computer, you have no way of saving a preset within the effects dialog boxes and revisit your old settings.

A handy workaround I found is fairly simple for keeping your settings with your document. Simply take a screen-shot of the desired dialog box with your preferred settings and paste it within your Illustrator document. That way an image of the dialog box is embedded within the document and you can follow those settings when you need them again, weather it is tomorrow or in a few weeks/months. You can keep them on a separate layer and collect a few common settings. Just remember to delete them before print production.

Open your dialog box and set your preferred settings and then follow this procedure:
MacOSX: Hold Command+Shift+Ctrl+4, when the crosshair appears press Space and then select the dialog box to grab it. After grabbing, close the dialog box and paste your image on the Illustrator Artboard using Command+v.
XP/Vista: Select the dialog box, Hold ALT+PrntScr to grab an image, close the dialog box and paste your image on the Illustrator Artboard using Ctrl+v.

Illustrator Crashes using Pathfinder

Sunday, February 11, 2007

Appearance Palette Crashes Illustrator

After you first install Illustrator on MacOSX you may be faced with the problem of Illustrator crashing without warning. This usually occurs when Illustrator is performing complex actions such as in the Pathfinder. There is a solution to this problem, which I found on the Adobe support page. Follow this routine and your problem should be solved:

Run Illustrator.
Close the Appearance palette.
Quit Illustrator.
Run Illustrator again.

And now when you run Illustrator it should be fixed, and you can now use pathfinder to your liking. The Adobe support page does not explain what the problem is, but it seems to be a software bug related to the Appearance palette and perhaps Intel based Macs. However you should not be afraid of using the appearance palette, because after your crashing problem is fixed for the first time, you can open up your appearance palette again and use it as you normally would.

Scrubby Sliders

Friday, February 9, 2007

Scrubby Sliders

In all Adobe programs scrubby sliders let you have the option of setting a value or dragging a slider without having to actually grab the slider. Simply place your mouse over the name of the value (for instance the Opacity value in the Layers palette), click and drag from left to right to set the value. This works with most values, not all, and is really a great time saver if you get the hang of it. You can also hold SHIFT while dragging to set the value by ten.

And a related tip: To set the value of a setting using the keyboard simply click the name to highlight it (or click the number), and use the up & down arrows on your keyboard to increment the value up and down. Hold SHIFT to increment values by ten.